Walk Man
Creative Process
1) Brainstorm
Every creative project starts with the team’s brainstorming, and of course, it is accompanied by some references.
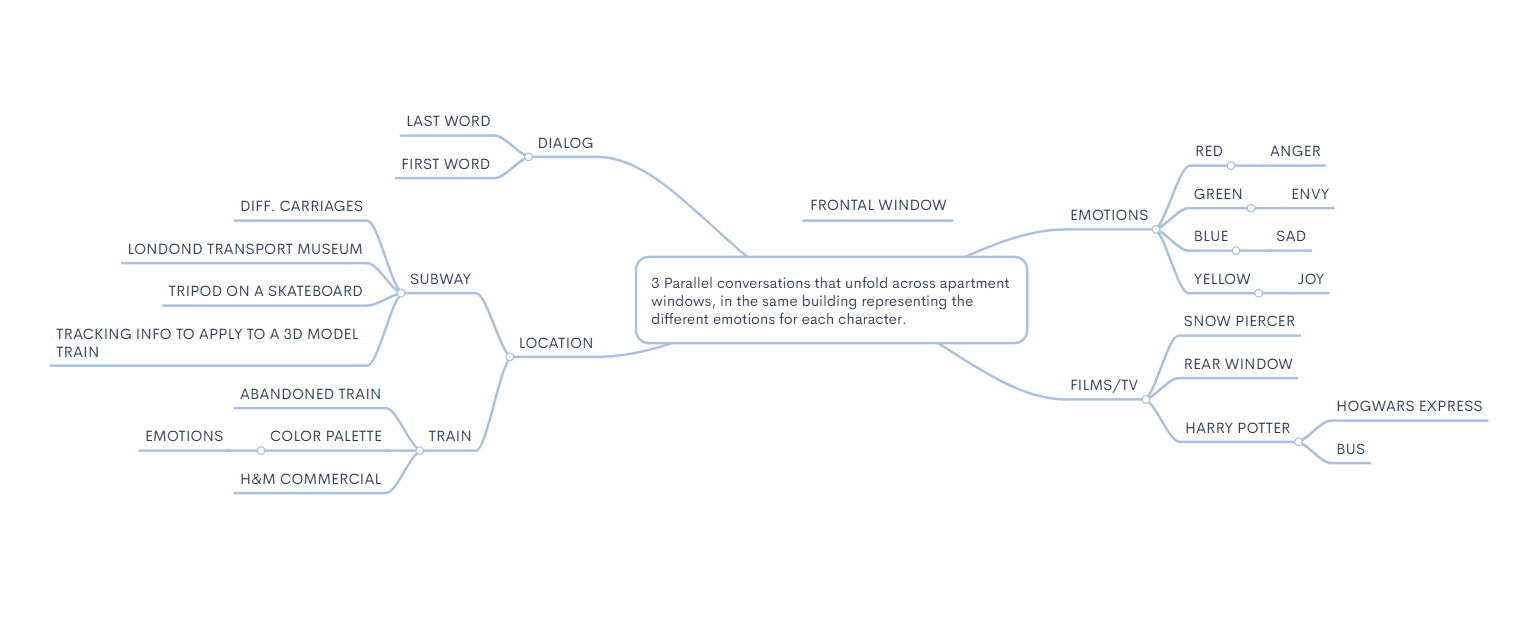
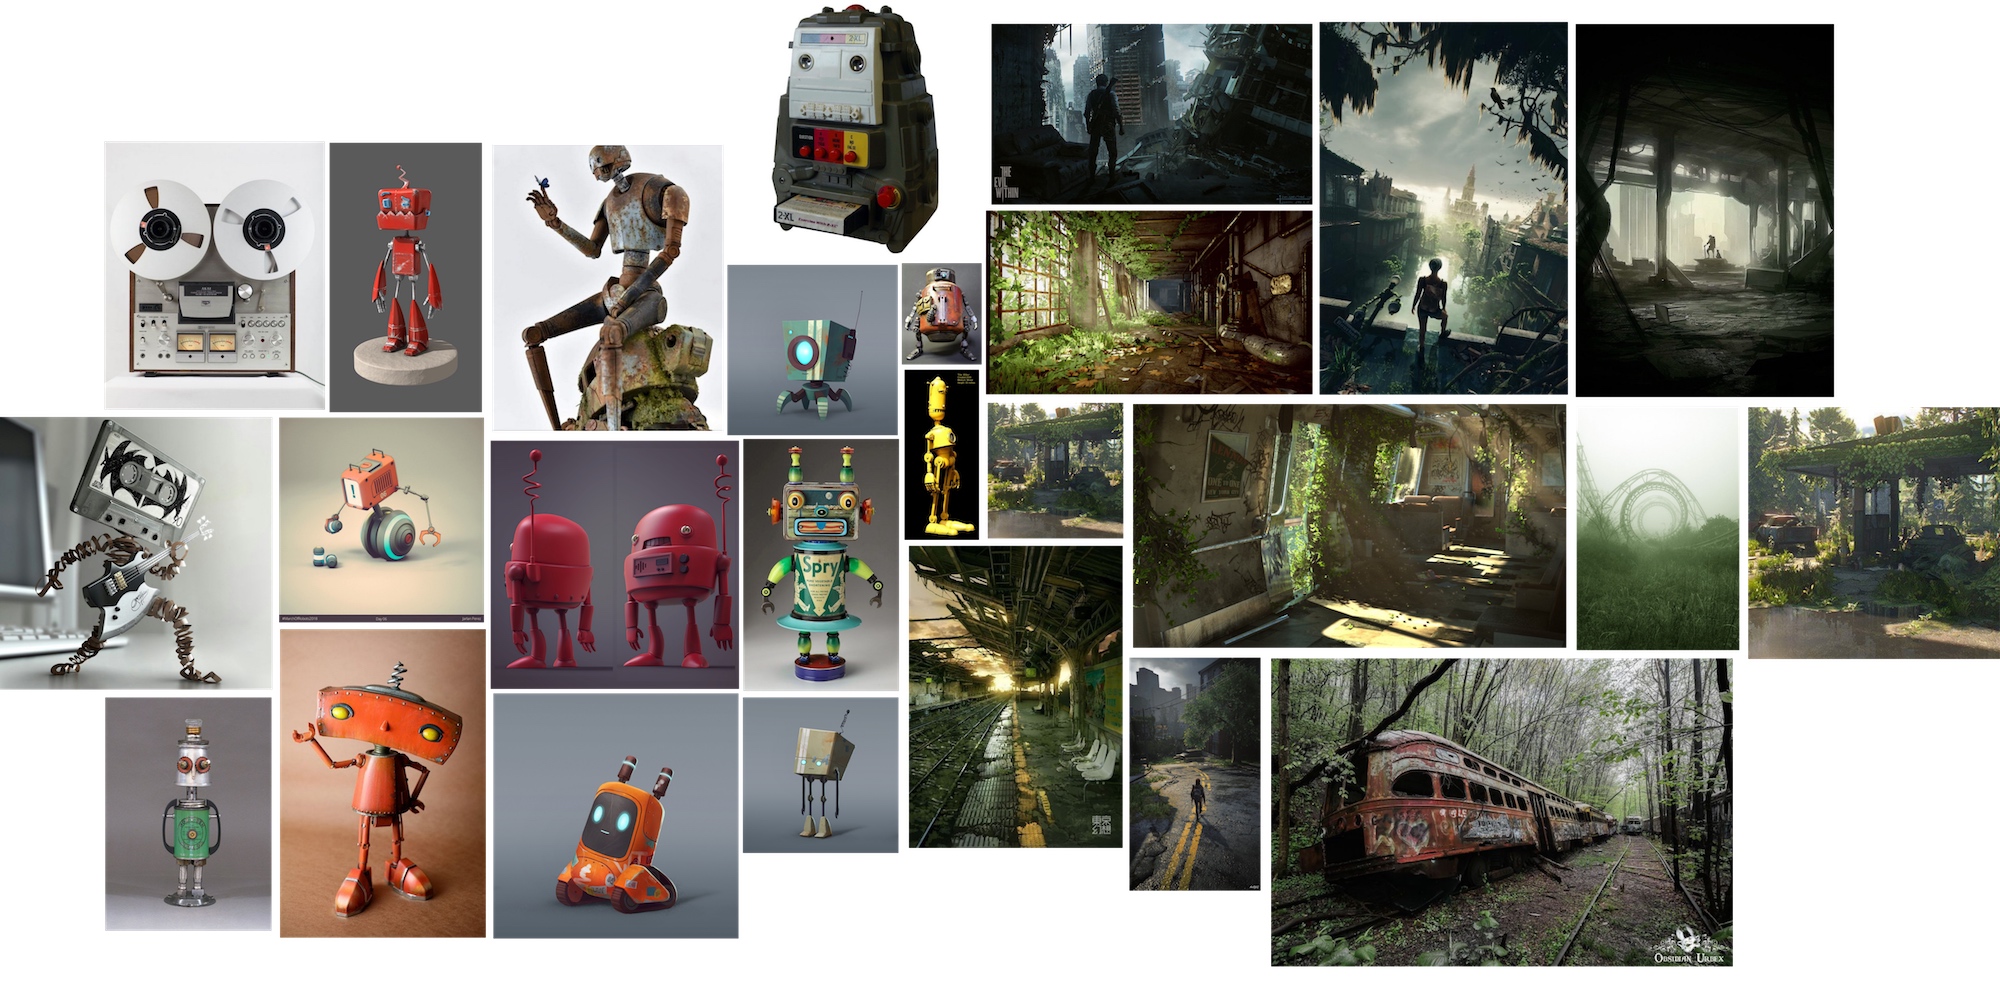
Our team gave birth to two interesting creative directions on the first day of establishment, one is about robots and the other is about trains.
The idea of the robot is from “Love and Monsters”, and the idea of the train is from a holiday promotional video of H&M: “Come Together”.
So we want to make a short film about robots, or a short film that uses different window spaces to shuttle and synthesize.
https://youtu.be/aXLO2dFfwLE
The first week is a divergent week, we have no limits to discuss, and use mind maps to record our thoughts.

2) Project establishment
In the second week, we started to do subtraction. Taking into account the current situation of the epidemic and the possibility of location shooting, we initially selected the robot plan, updated the final project mind map, and decided to use “Walk Man” The name of the project and the overall story idea are also recognized by the teacher. At the same time, we have established the OneDrive cloud disk and the Planner project plan to provide collaborative support for future project cooperation.

3) Moodboard
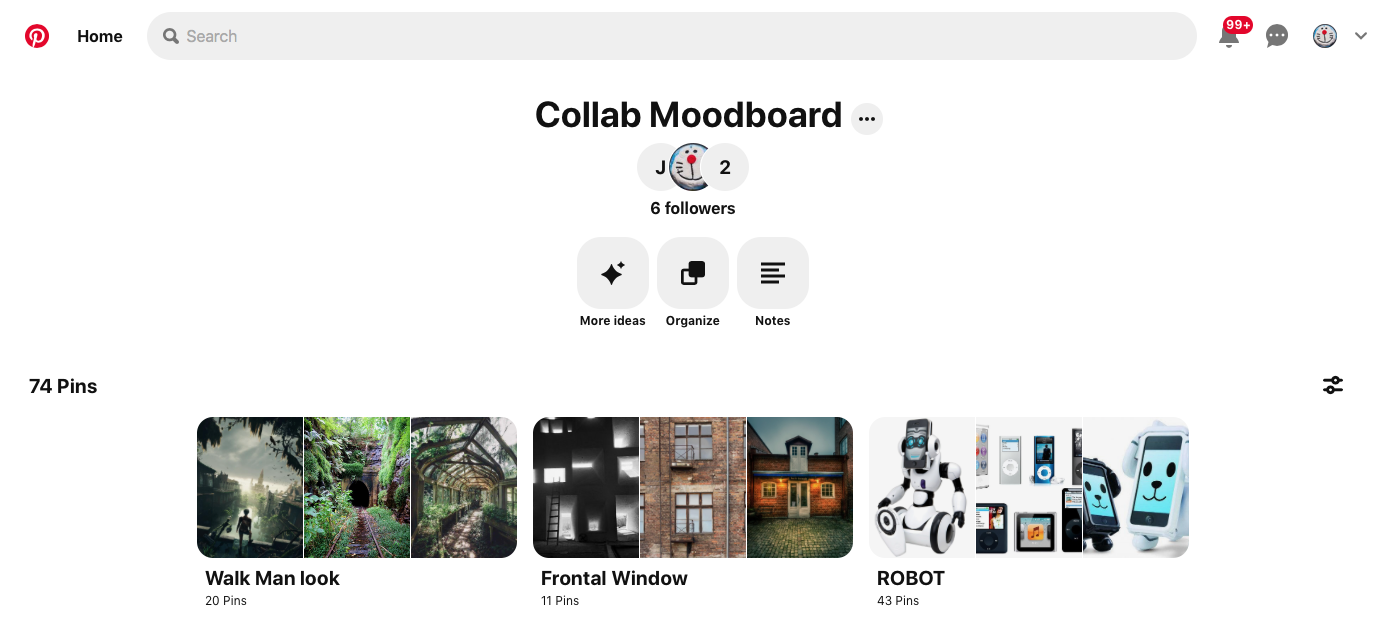
This week, all team members began to look for various reference pictures about robots and windows on Pinterest to further establish the design we want to make. We use Pinterest’s sharing group to achieve group collaboration. In the end, we successfully completed and outlined what we wanted to do, and further intuitively showed it to everyone. The teacher recognized our ideas very much and suggested that we can choose the robot plan to advance.
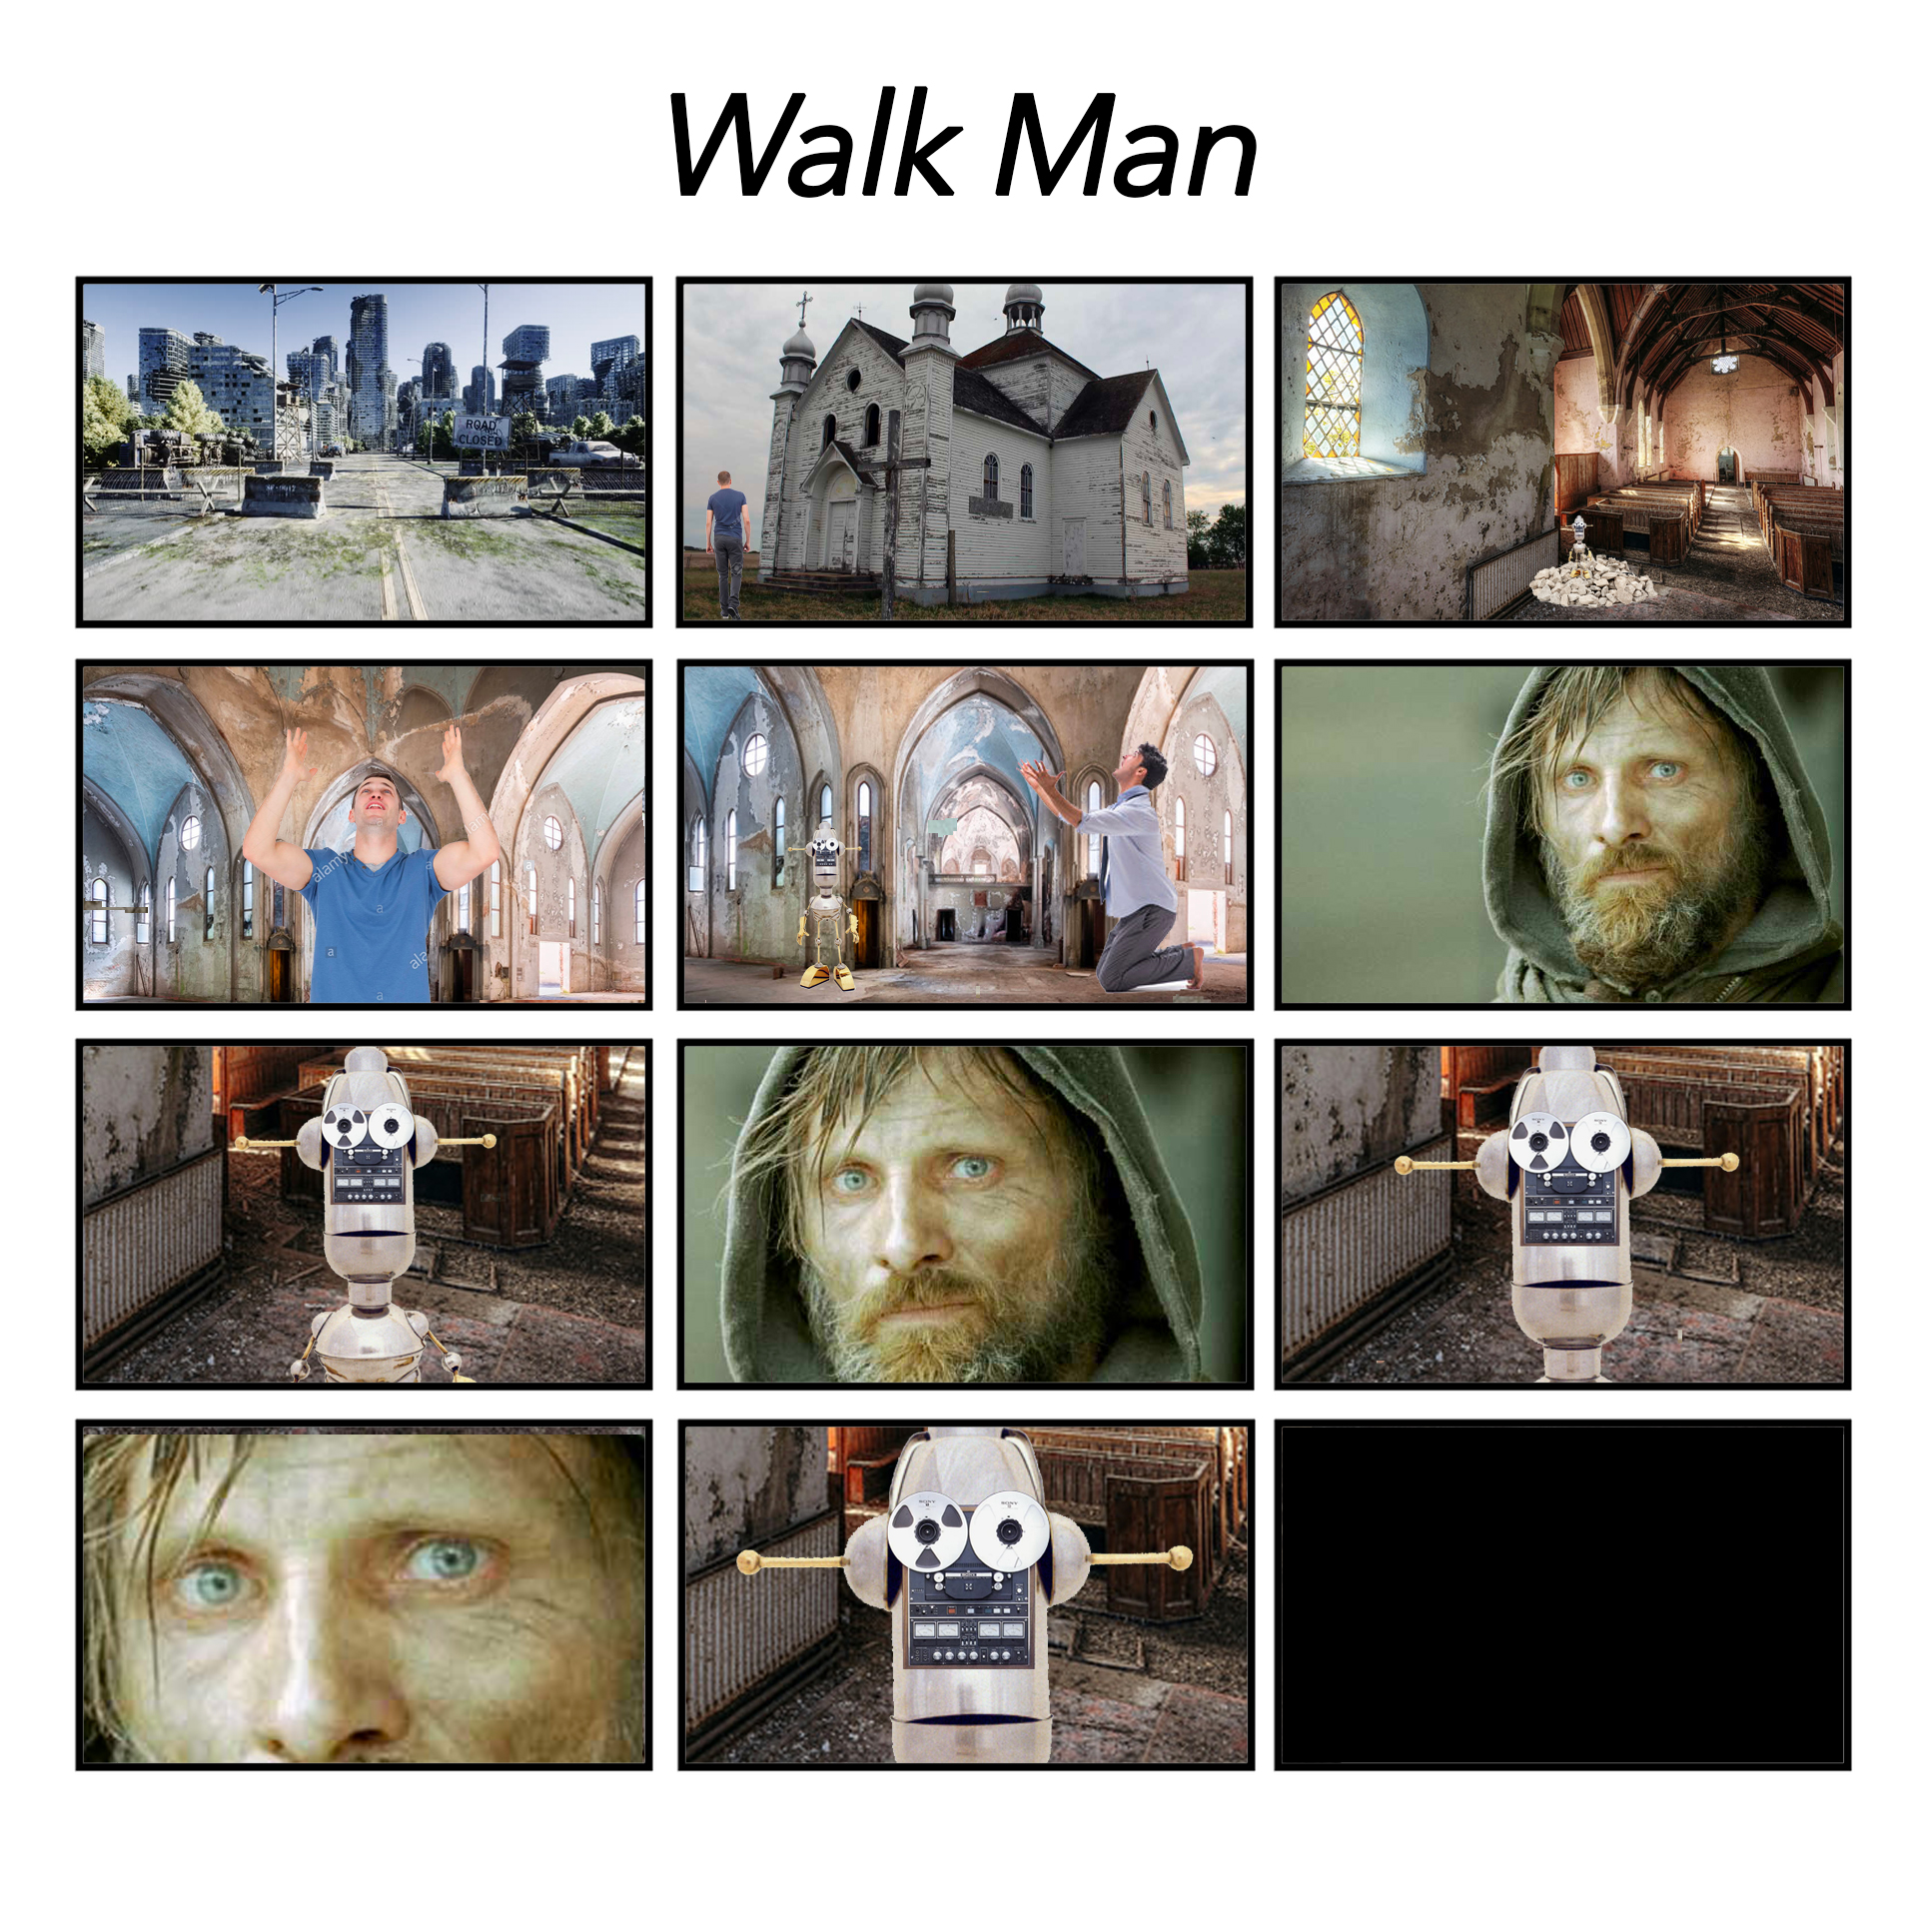
4) Storyboard
This part was completed by Jane. She used her painting and image processing techniques to quickly express our story flow and storytelling. At this time, a lot of references to the Moodboard that have been done before come in handy, making the storyboard very accurate and clear.
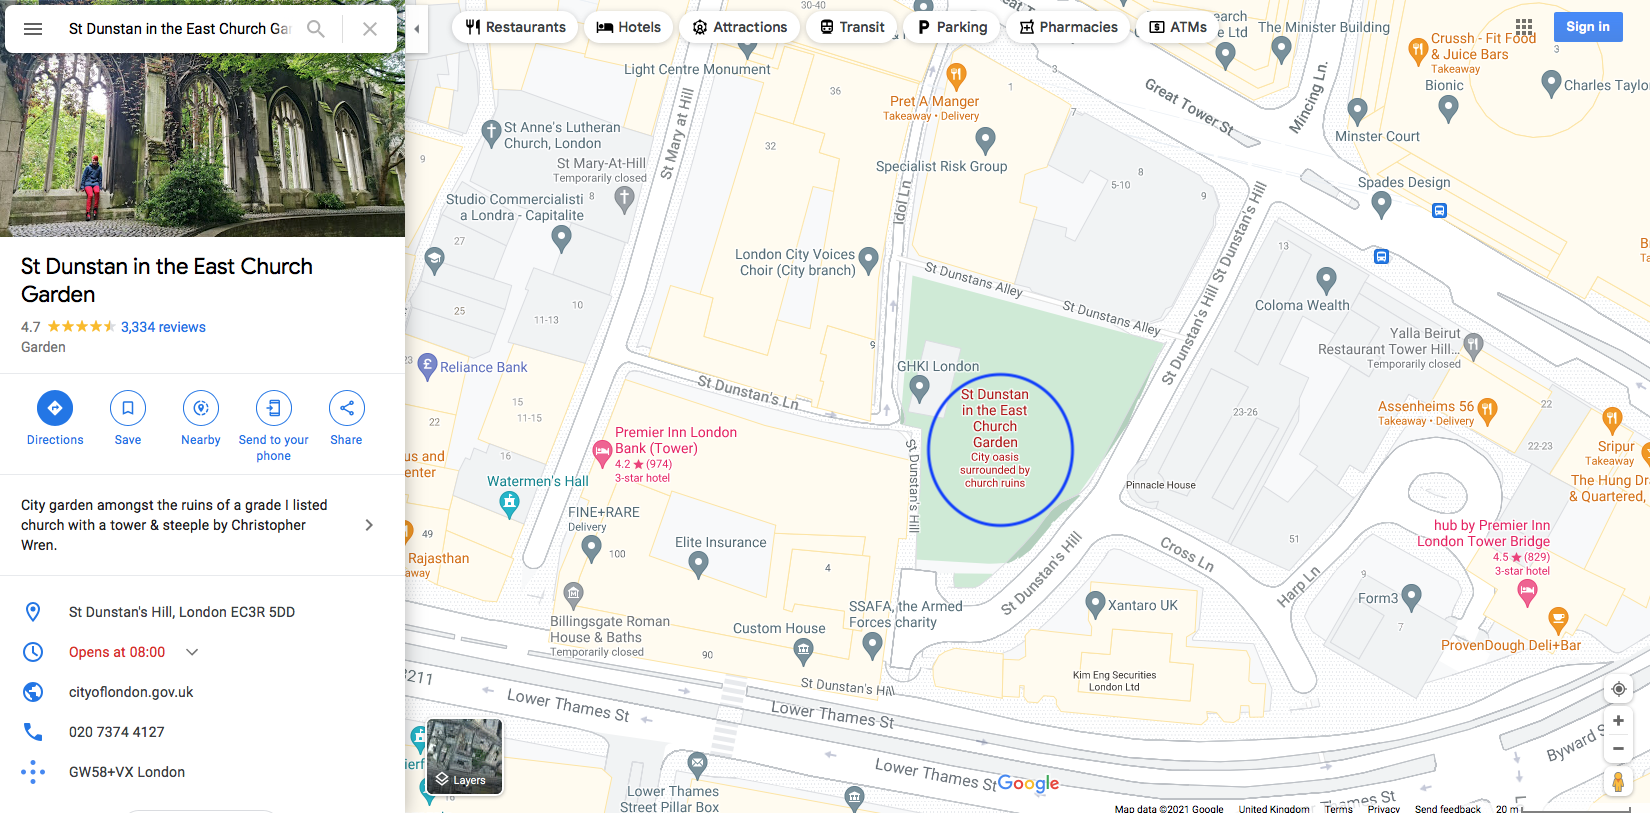
5) Site selection
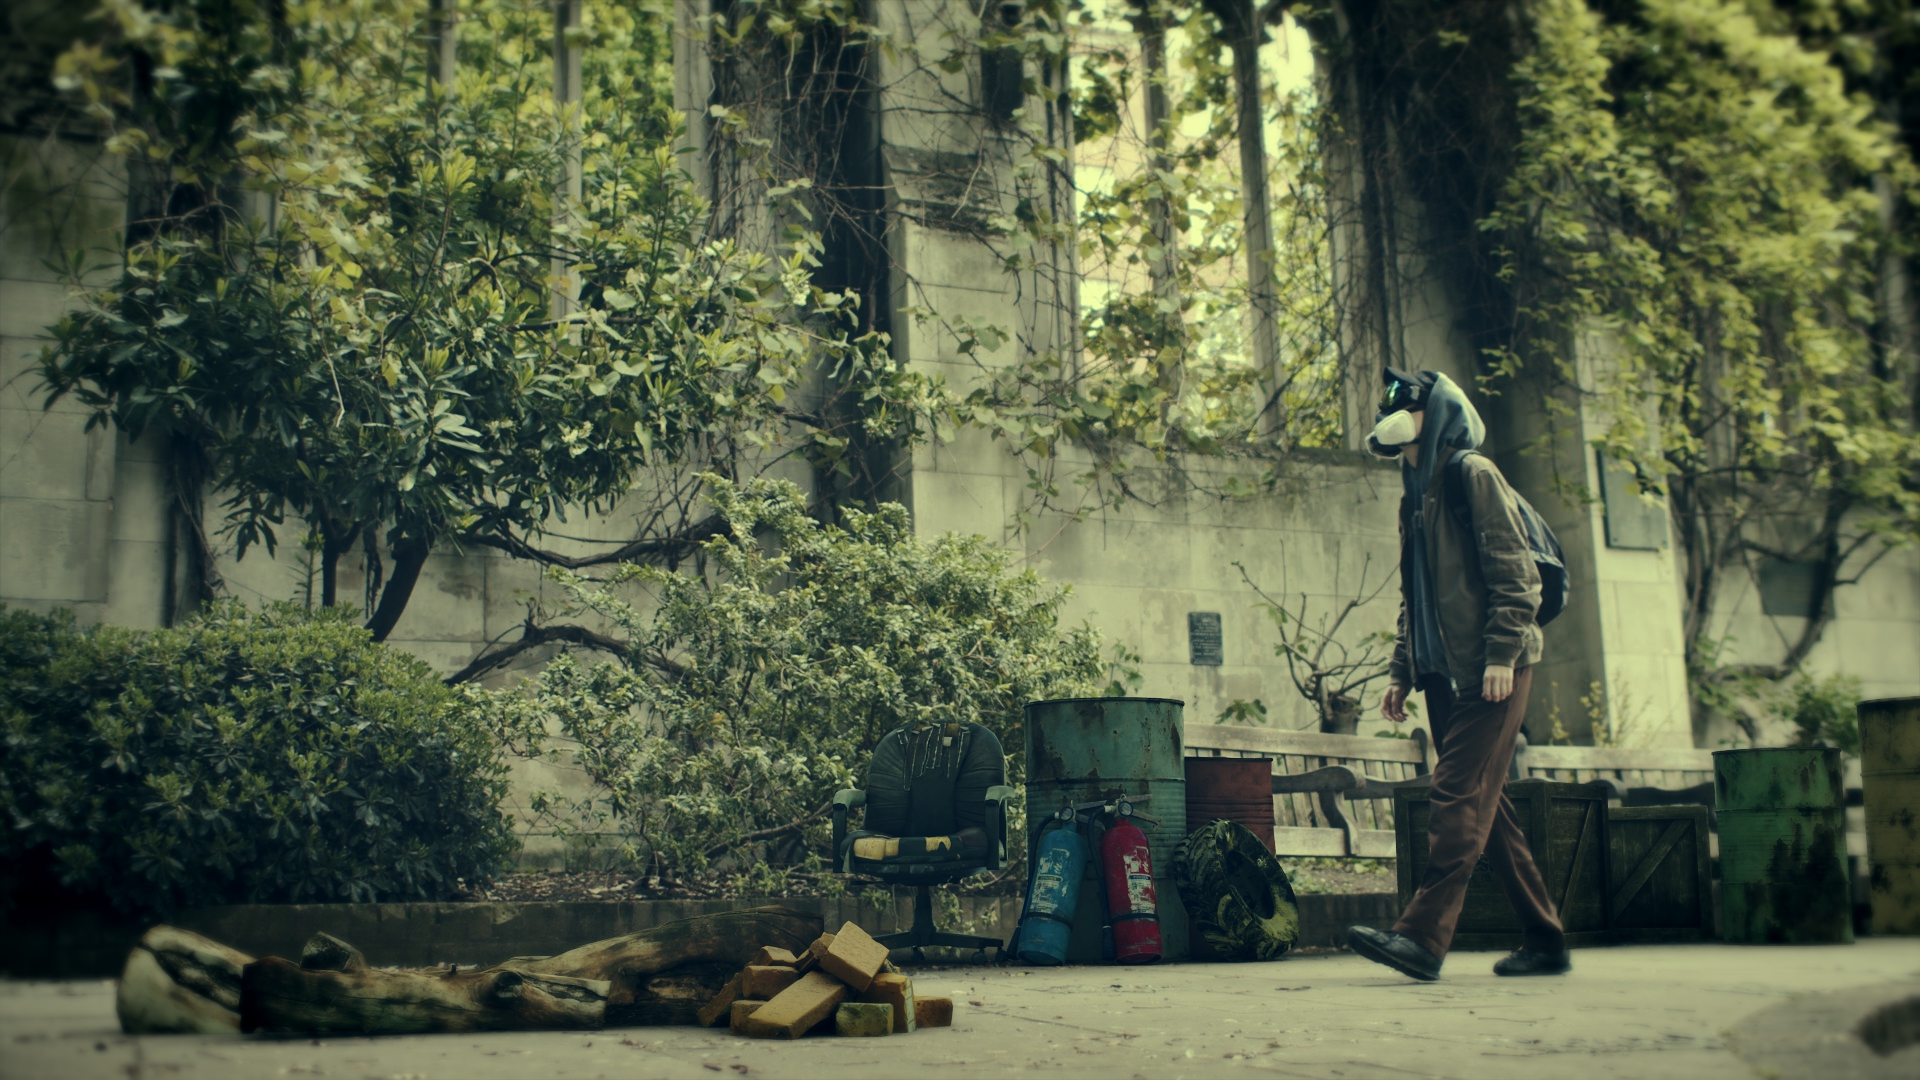
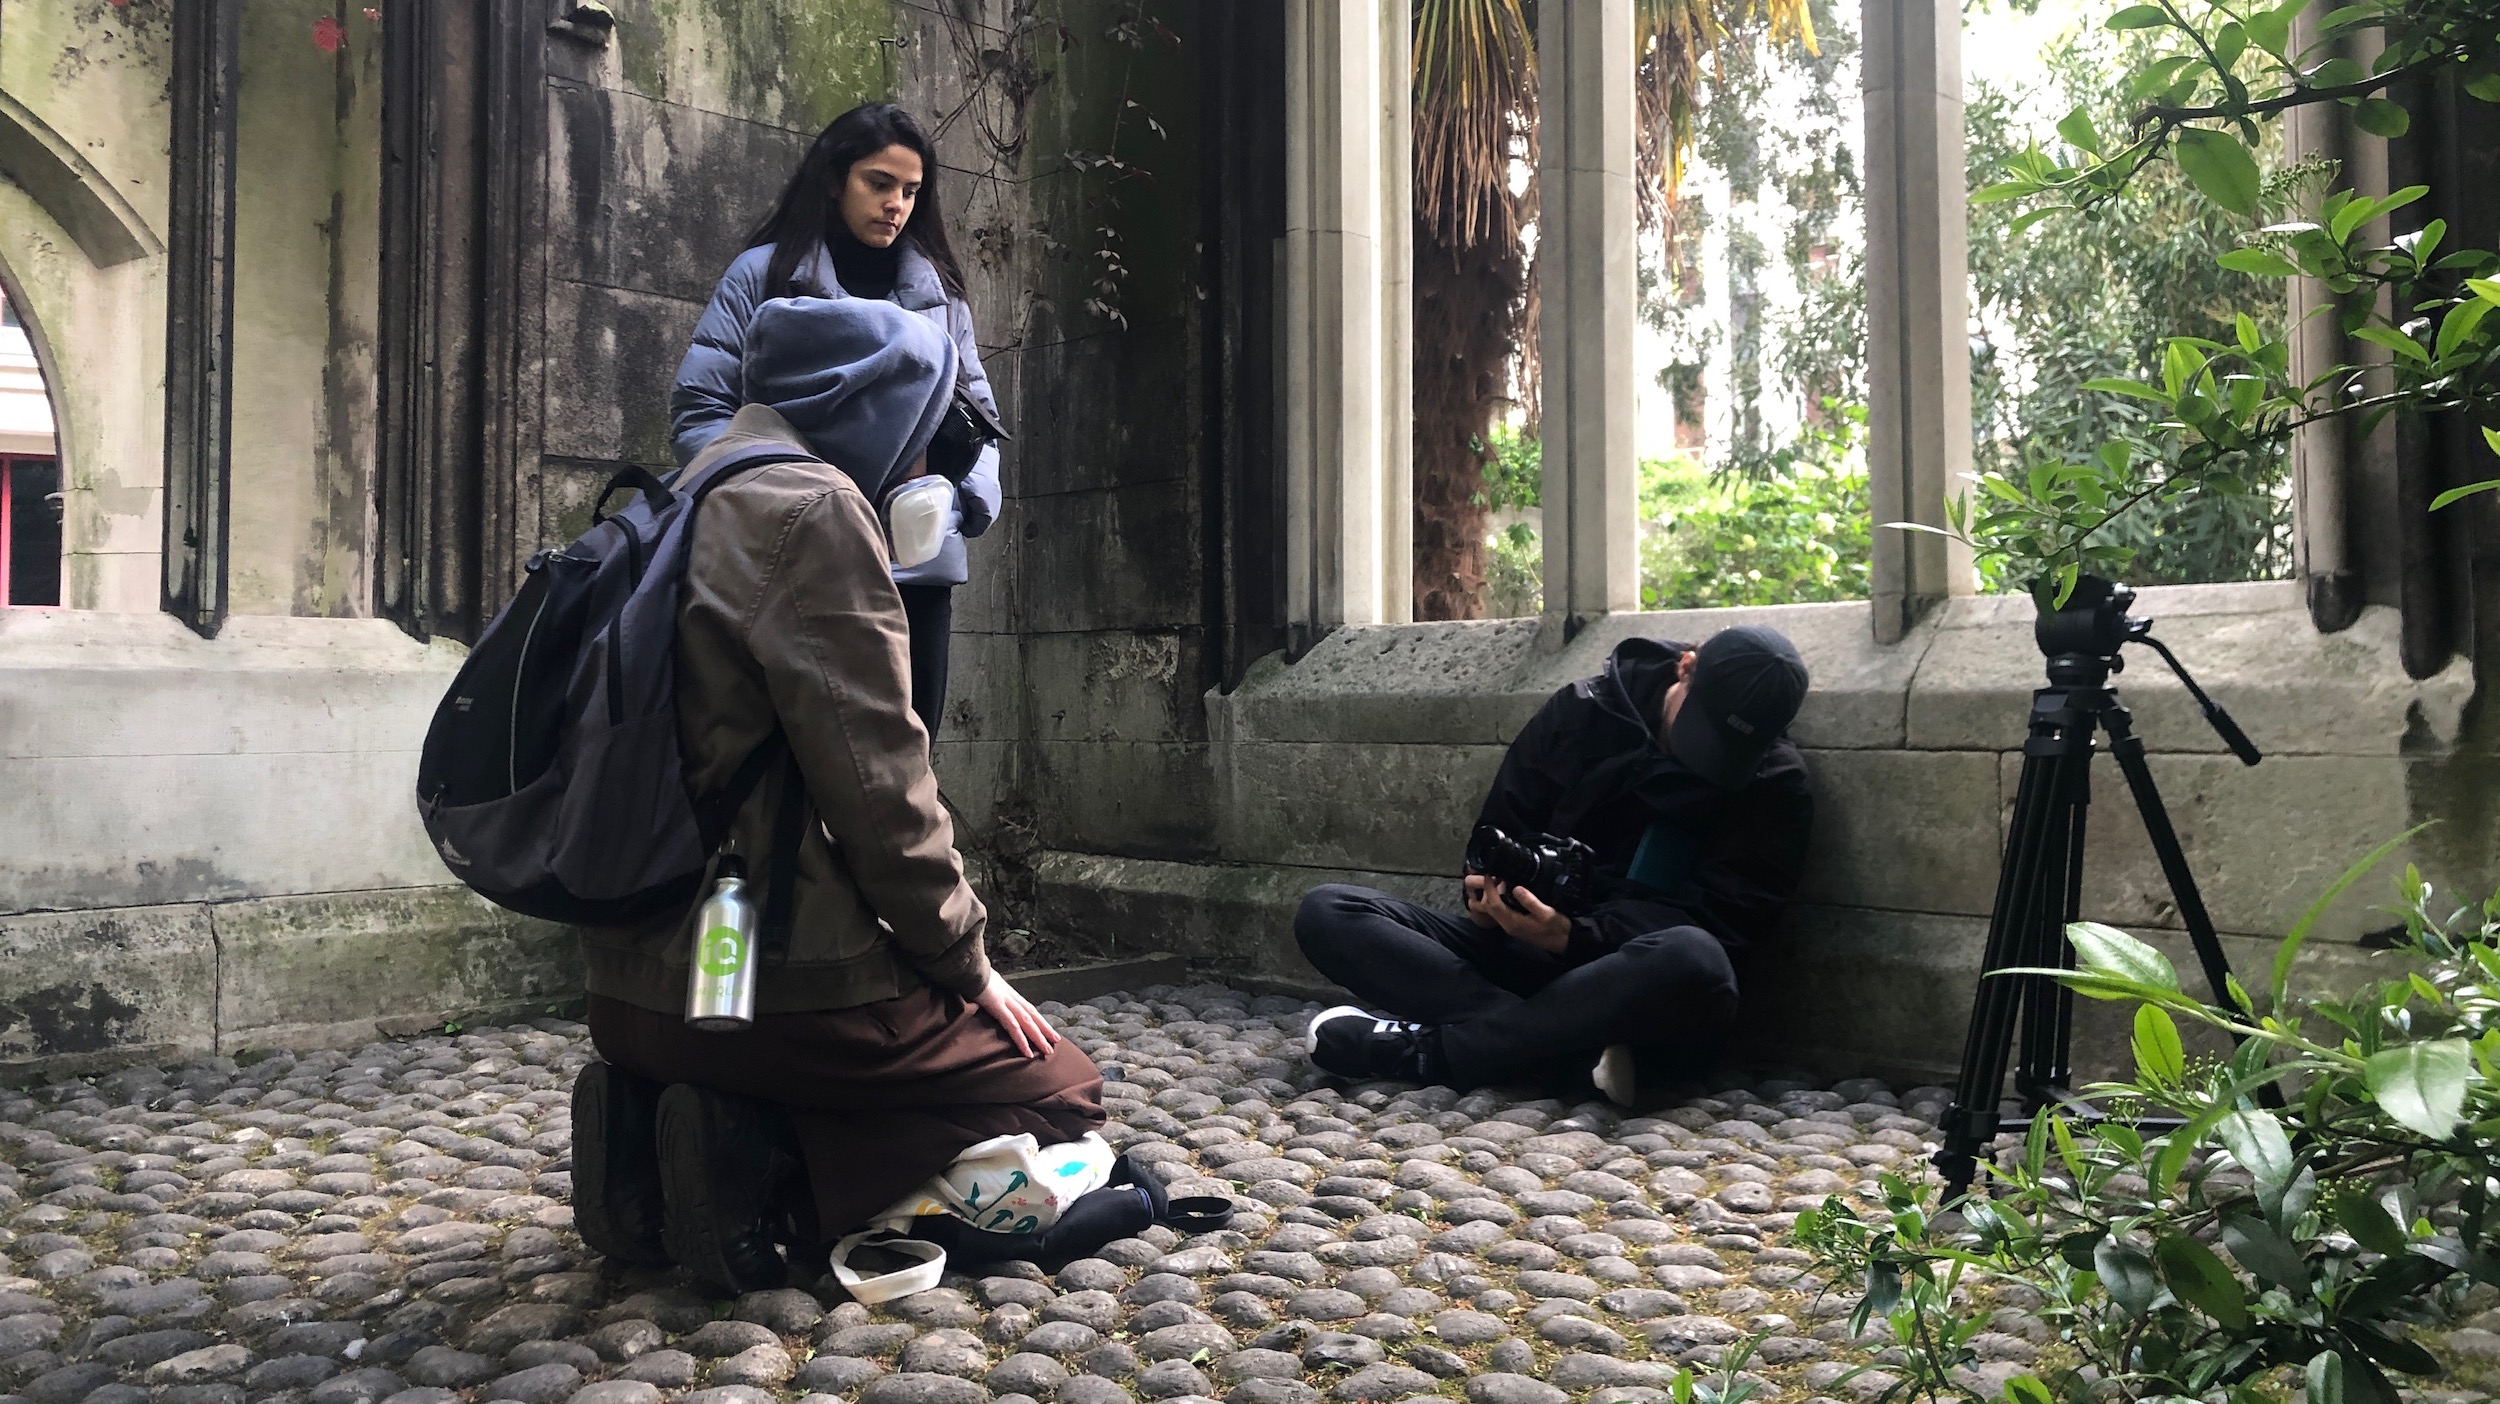
Our project needs to find a good church building. It must be old enough and covered with some plants, preferably the kind of architectural ruins that have been left. In the process of determining the location of the shooting, Giulia proposed a preferred ideal plan-“St Dunstan in the East Church Garden”, this church garden is an abandoned building, later rebuilt into a park, the architectural style of the Middle Ages, and it has Enough residual building structure and plants. This became our final shooting location.

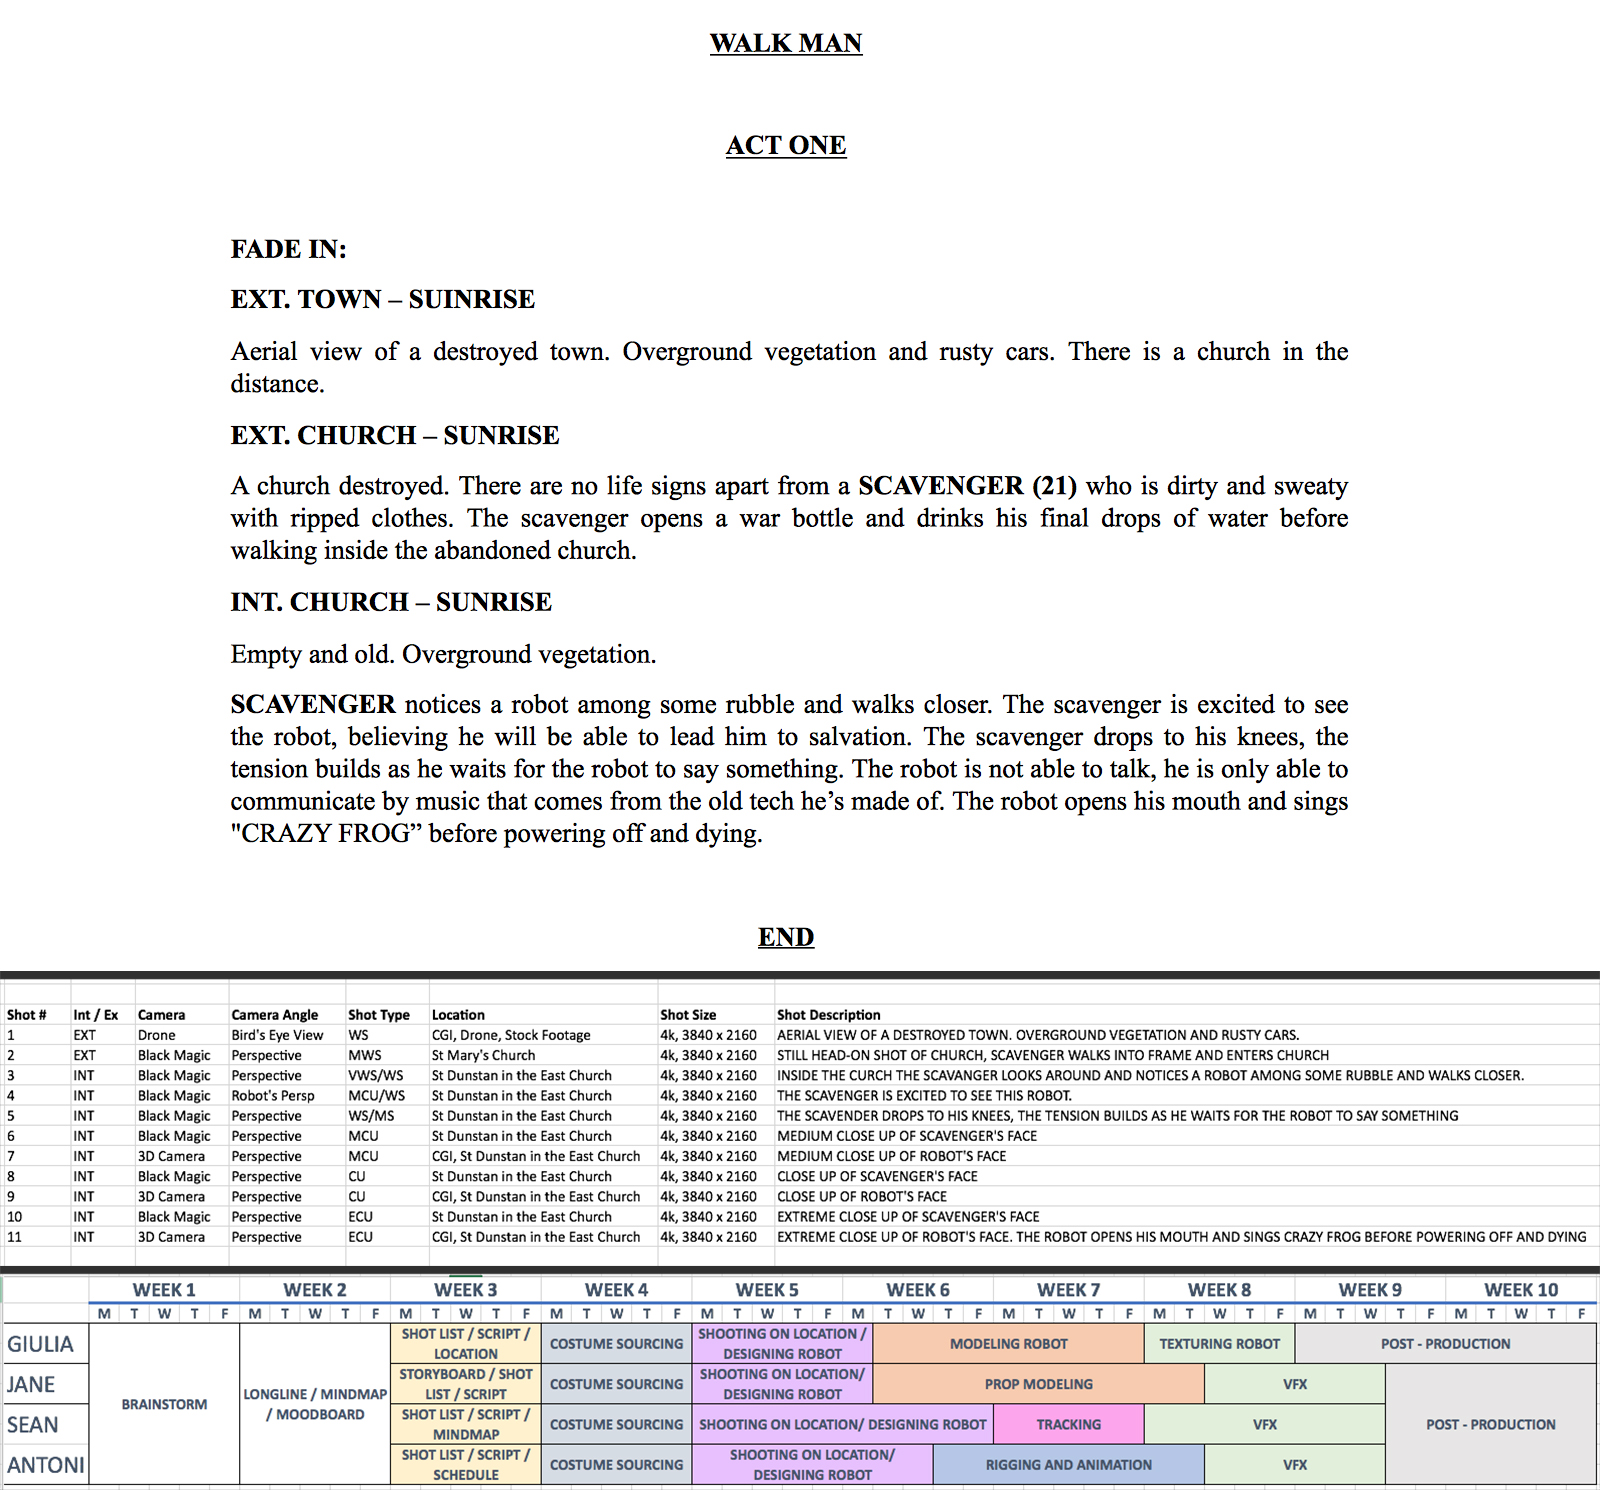
6) Script、Shotlist and Schedule
7) Camera selection
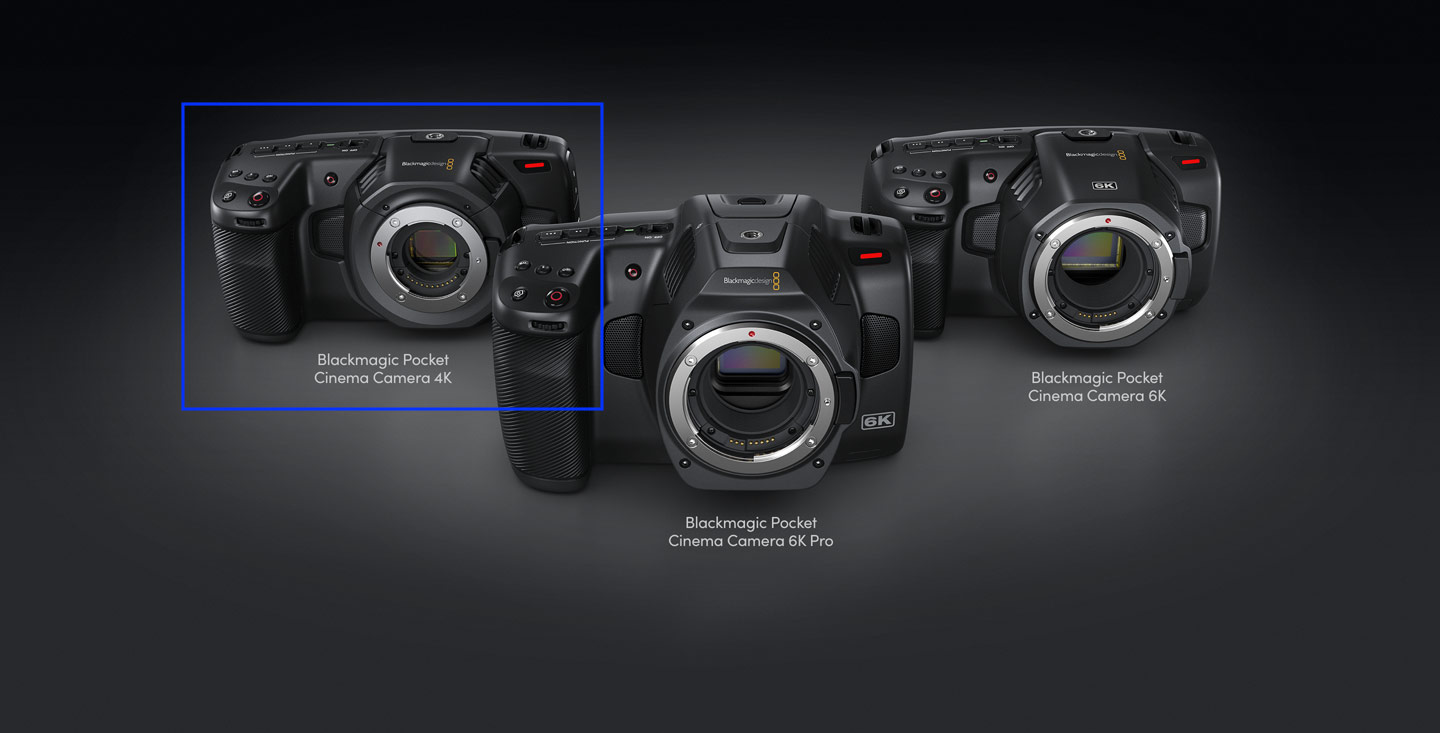
My team members started preparing and practising the use of the camera earlier than I did. We started renting Blackmagic Pocket Cinema Camera 4K from schools very early, because compared with other cameras, it is more suitable for shooting small and medium-sized projects, and it supports RAW format and ProRes encoding, and post-production can perfectly match DaVinci. This is ours The reason for choosing it. And it can record ambient sound and support 4K at the same time. In addition, in the colour space, we choose the Log colour process, Log can perfectly retain the information of the dark and bright parts of the image.
Video Code
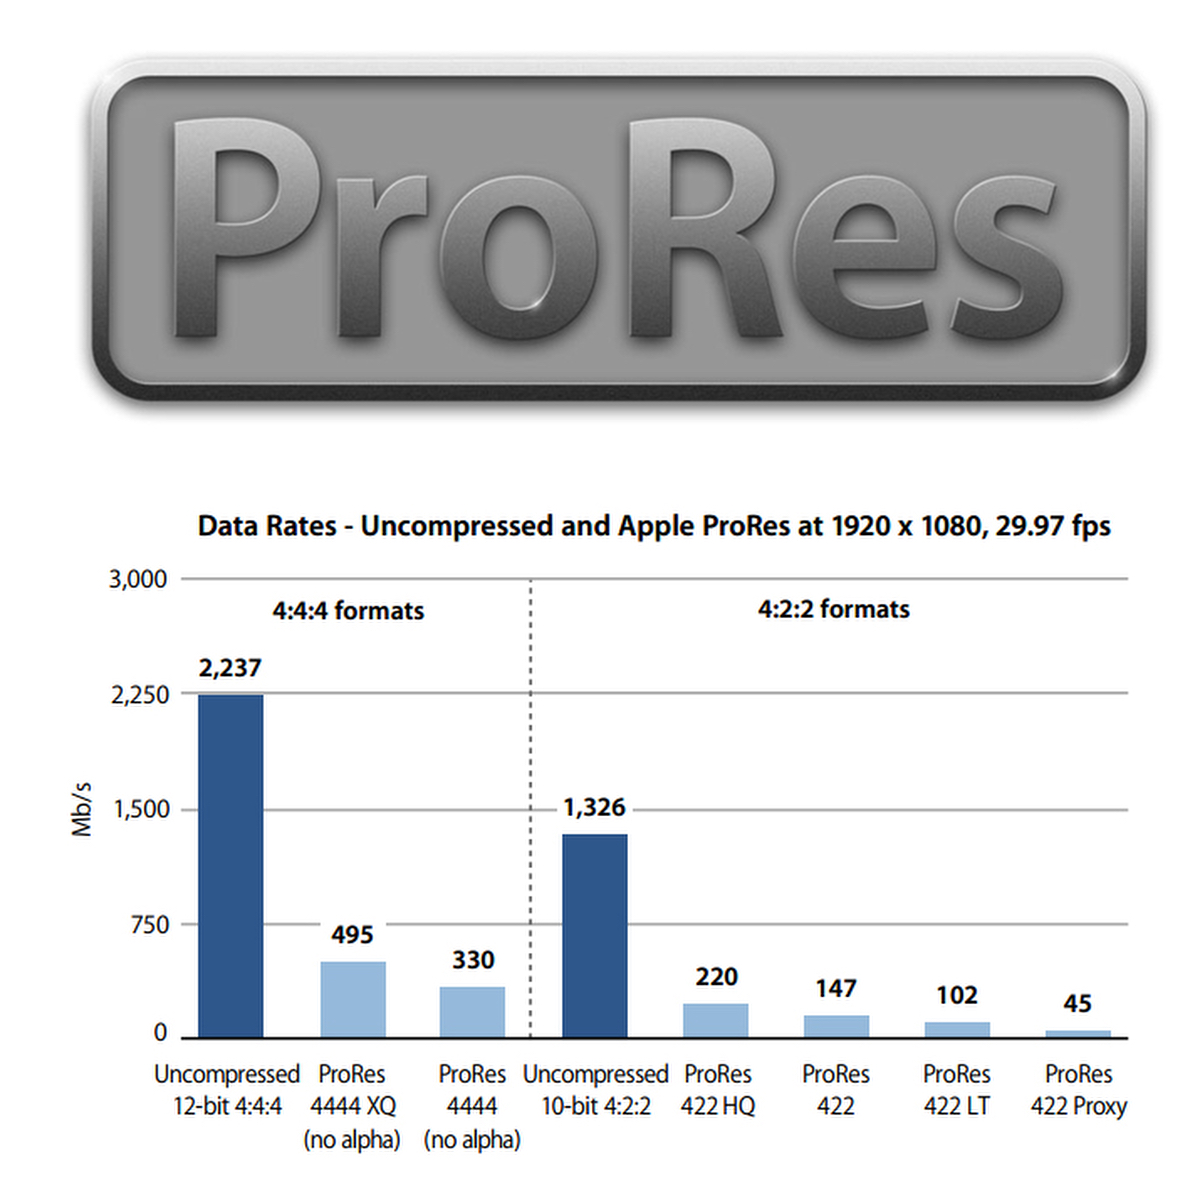
Apple ProRes 422
Apple ProRes 422 is a high-quality compressed codec offering nearly all the benefits of Apple ProRes 422 HQ, but at 66 percent of the data rate for even better multistream, real-time editing performance. The target data rate is approximately 147 Mbps at 1920×1080 and 29.97 fps.
Apple ProRes 422 is also 10-bit colour, which can provide 4 times the number of colours than 8-bit colour. Under high dynamics, gradients, and complex pictures, it shows smoother and more delicate colour details.
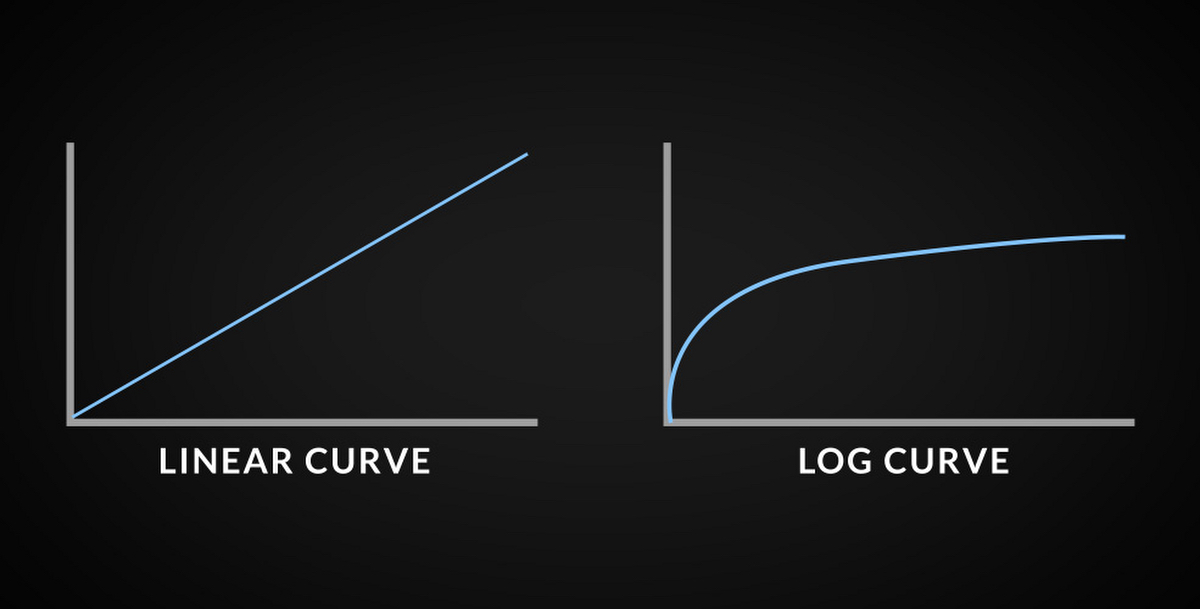
Colour Space
The biggest reason to use the Log colour curve is how it retains the most dynamic range of information from the camera sensor (or film negative). It encodes what the camera sees logarithmically, meaning that the correlation between the exposure of the image (measured in stops) and the recorded image is completely constant over a wider range. It utilizes more of the sensor’s information than a standard video curve because it’s saving as much data as possible rather than capturing specifically for the human eye or a video screen. This gives you much more colour data to work with in post-production.
On the other hand, in the part of 3D production, we use a linear colour difference workflow. Working with “linear colour” means lighting and rendering in a colour space where the mapping between numeric colour values and “absolute colour” is a straight line. This is the standard in digital cinema and is the best way to produce realistic lighting.

8) Prop costume preparation
We searched and purchased the costumes and props of the actors on the day of the shooting based on the Moodboard at the beginning. Everyone went to complete the item list separately, which made the whole team excited and excited. Especially at the moment of the epidemic, many items that could have been very convenient became difficult to buy. But because we started preparing it very early, we chose to buy some items such as old jackets and industrial masks. Some items such as hoodies, backpacks, water bottles, ski goggles, etc., we directly searched for them from home, and in the end, all of us completed all the items and props needed for the shooting on time.

9) Preparation for shooting
Before deciding to shoot, we first observe the recent weather forecast at all times and start to choose the best date. We need a morning light environment, it is best not to have too strong sunlight. At the same time, I take care of the camera and charge the 3 batteries. Charging took more time than originally expected. I couldn’t wait until 2 o’clock in the middle of the night. I had determined that the second battery was charged and replaced with the last battery.
10) Shooting
Because the preliminary preparations were quite adequate, everything went smoothly on the day of the shooting. It was only at the beginning that we were preparing to shoot 1080P, but found that the focal length of the lens became very close. Later, after Antoin switched the camera back to 4K mode, the focal length of the lens returned to normal. This experience is very valuable and can be used to guide the camera focal length in future work The problem of conversion. Jane was an actor on the day of the filming. She did a great job, while Antoin was in charge of the filming, and Giulia and I were in charge of the scene. The weather and light were perfect that day, just as everything was arranged. That was my happiest day this semester. All the planned sub-shots were completed in one morning, and the quality was very good.
11) Post-production
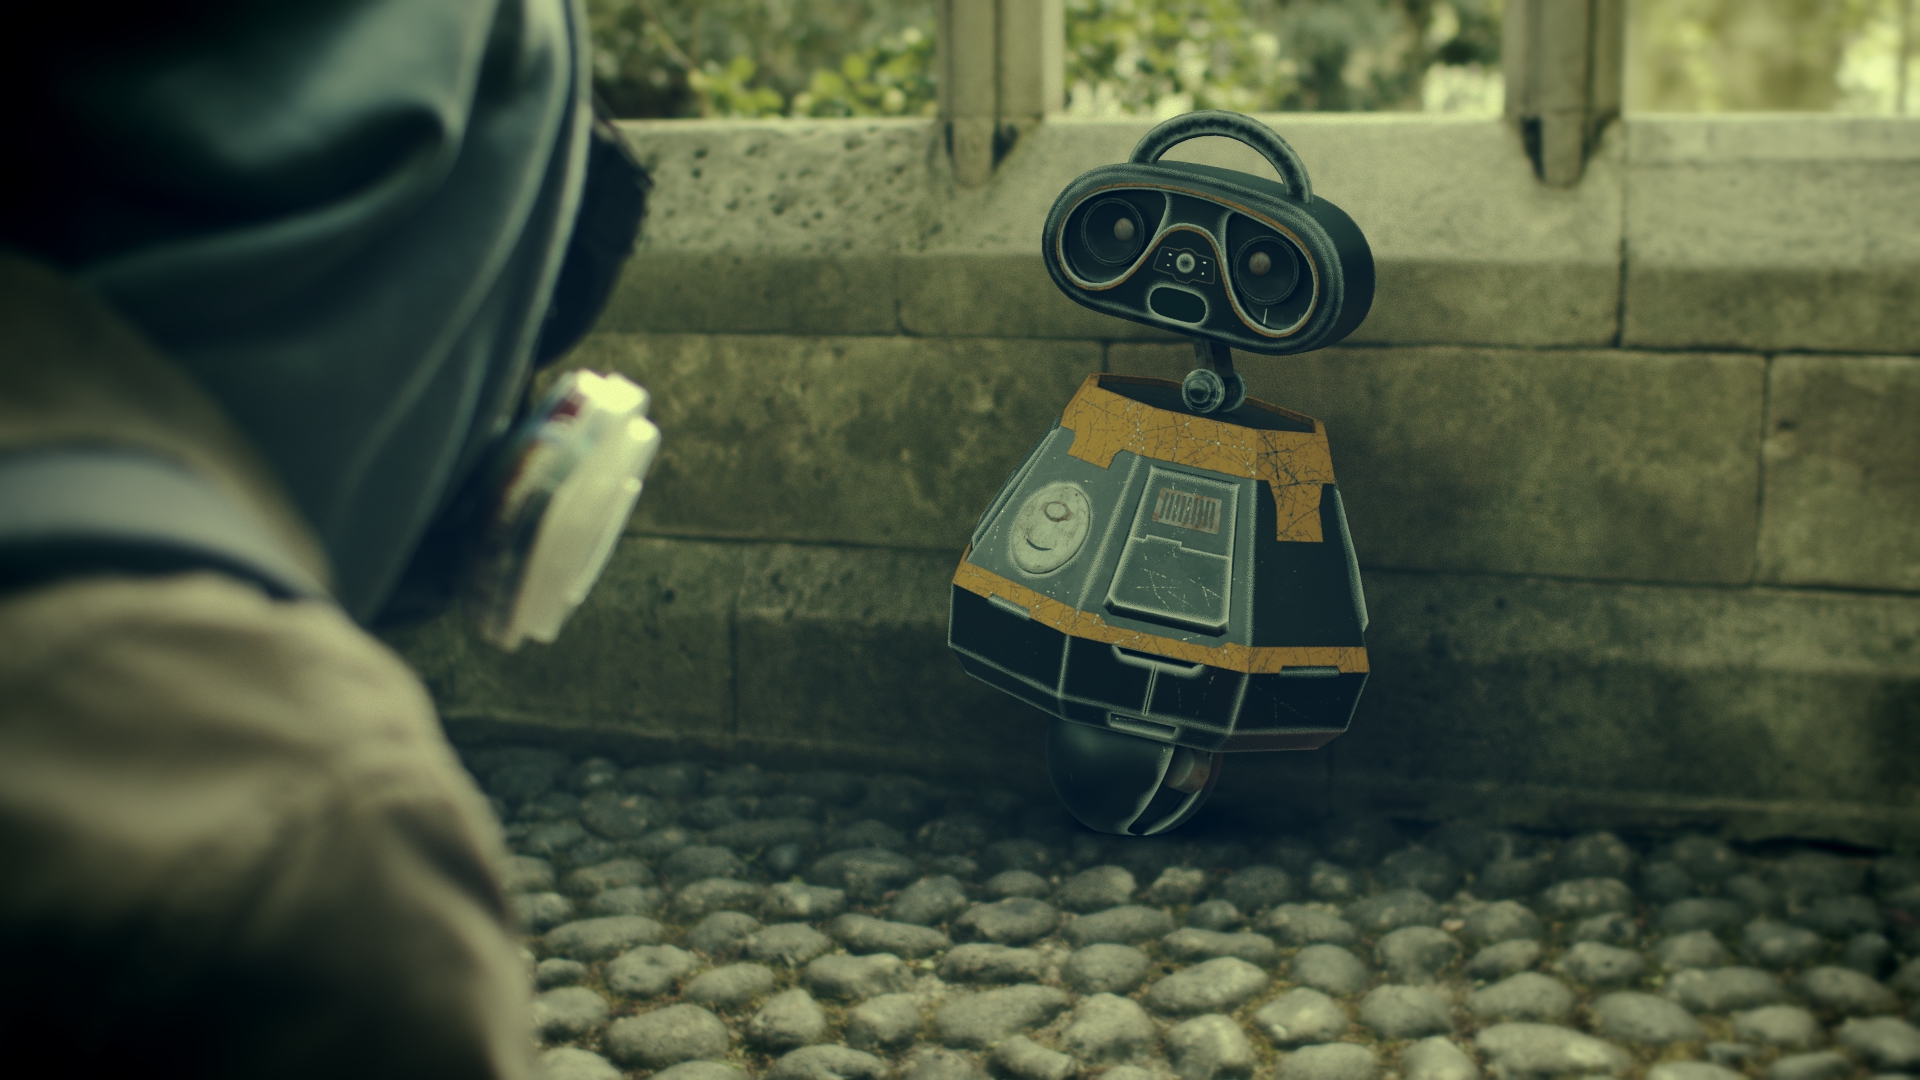
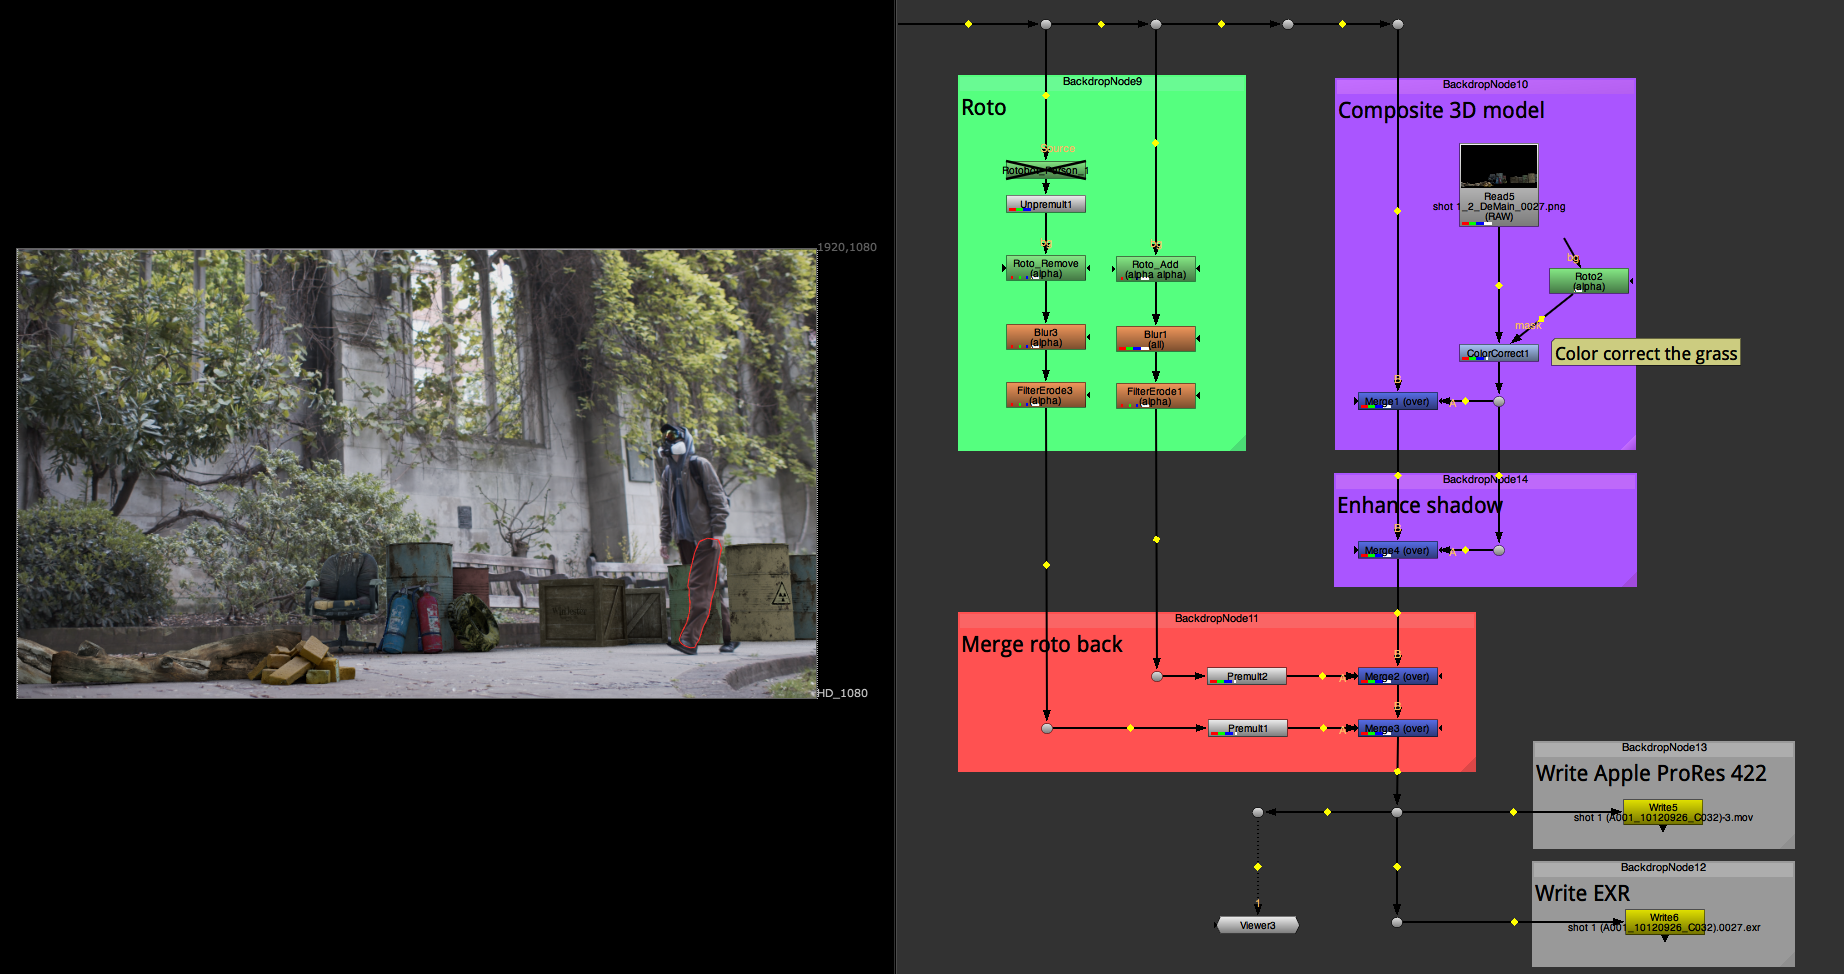
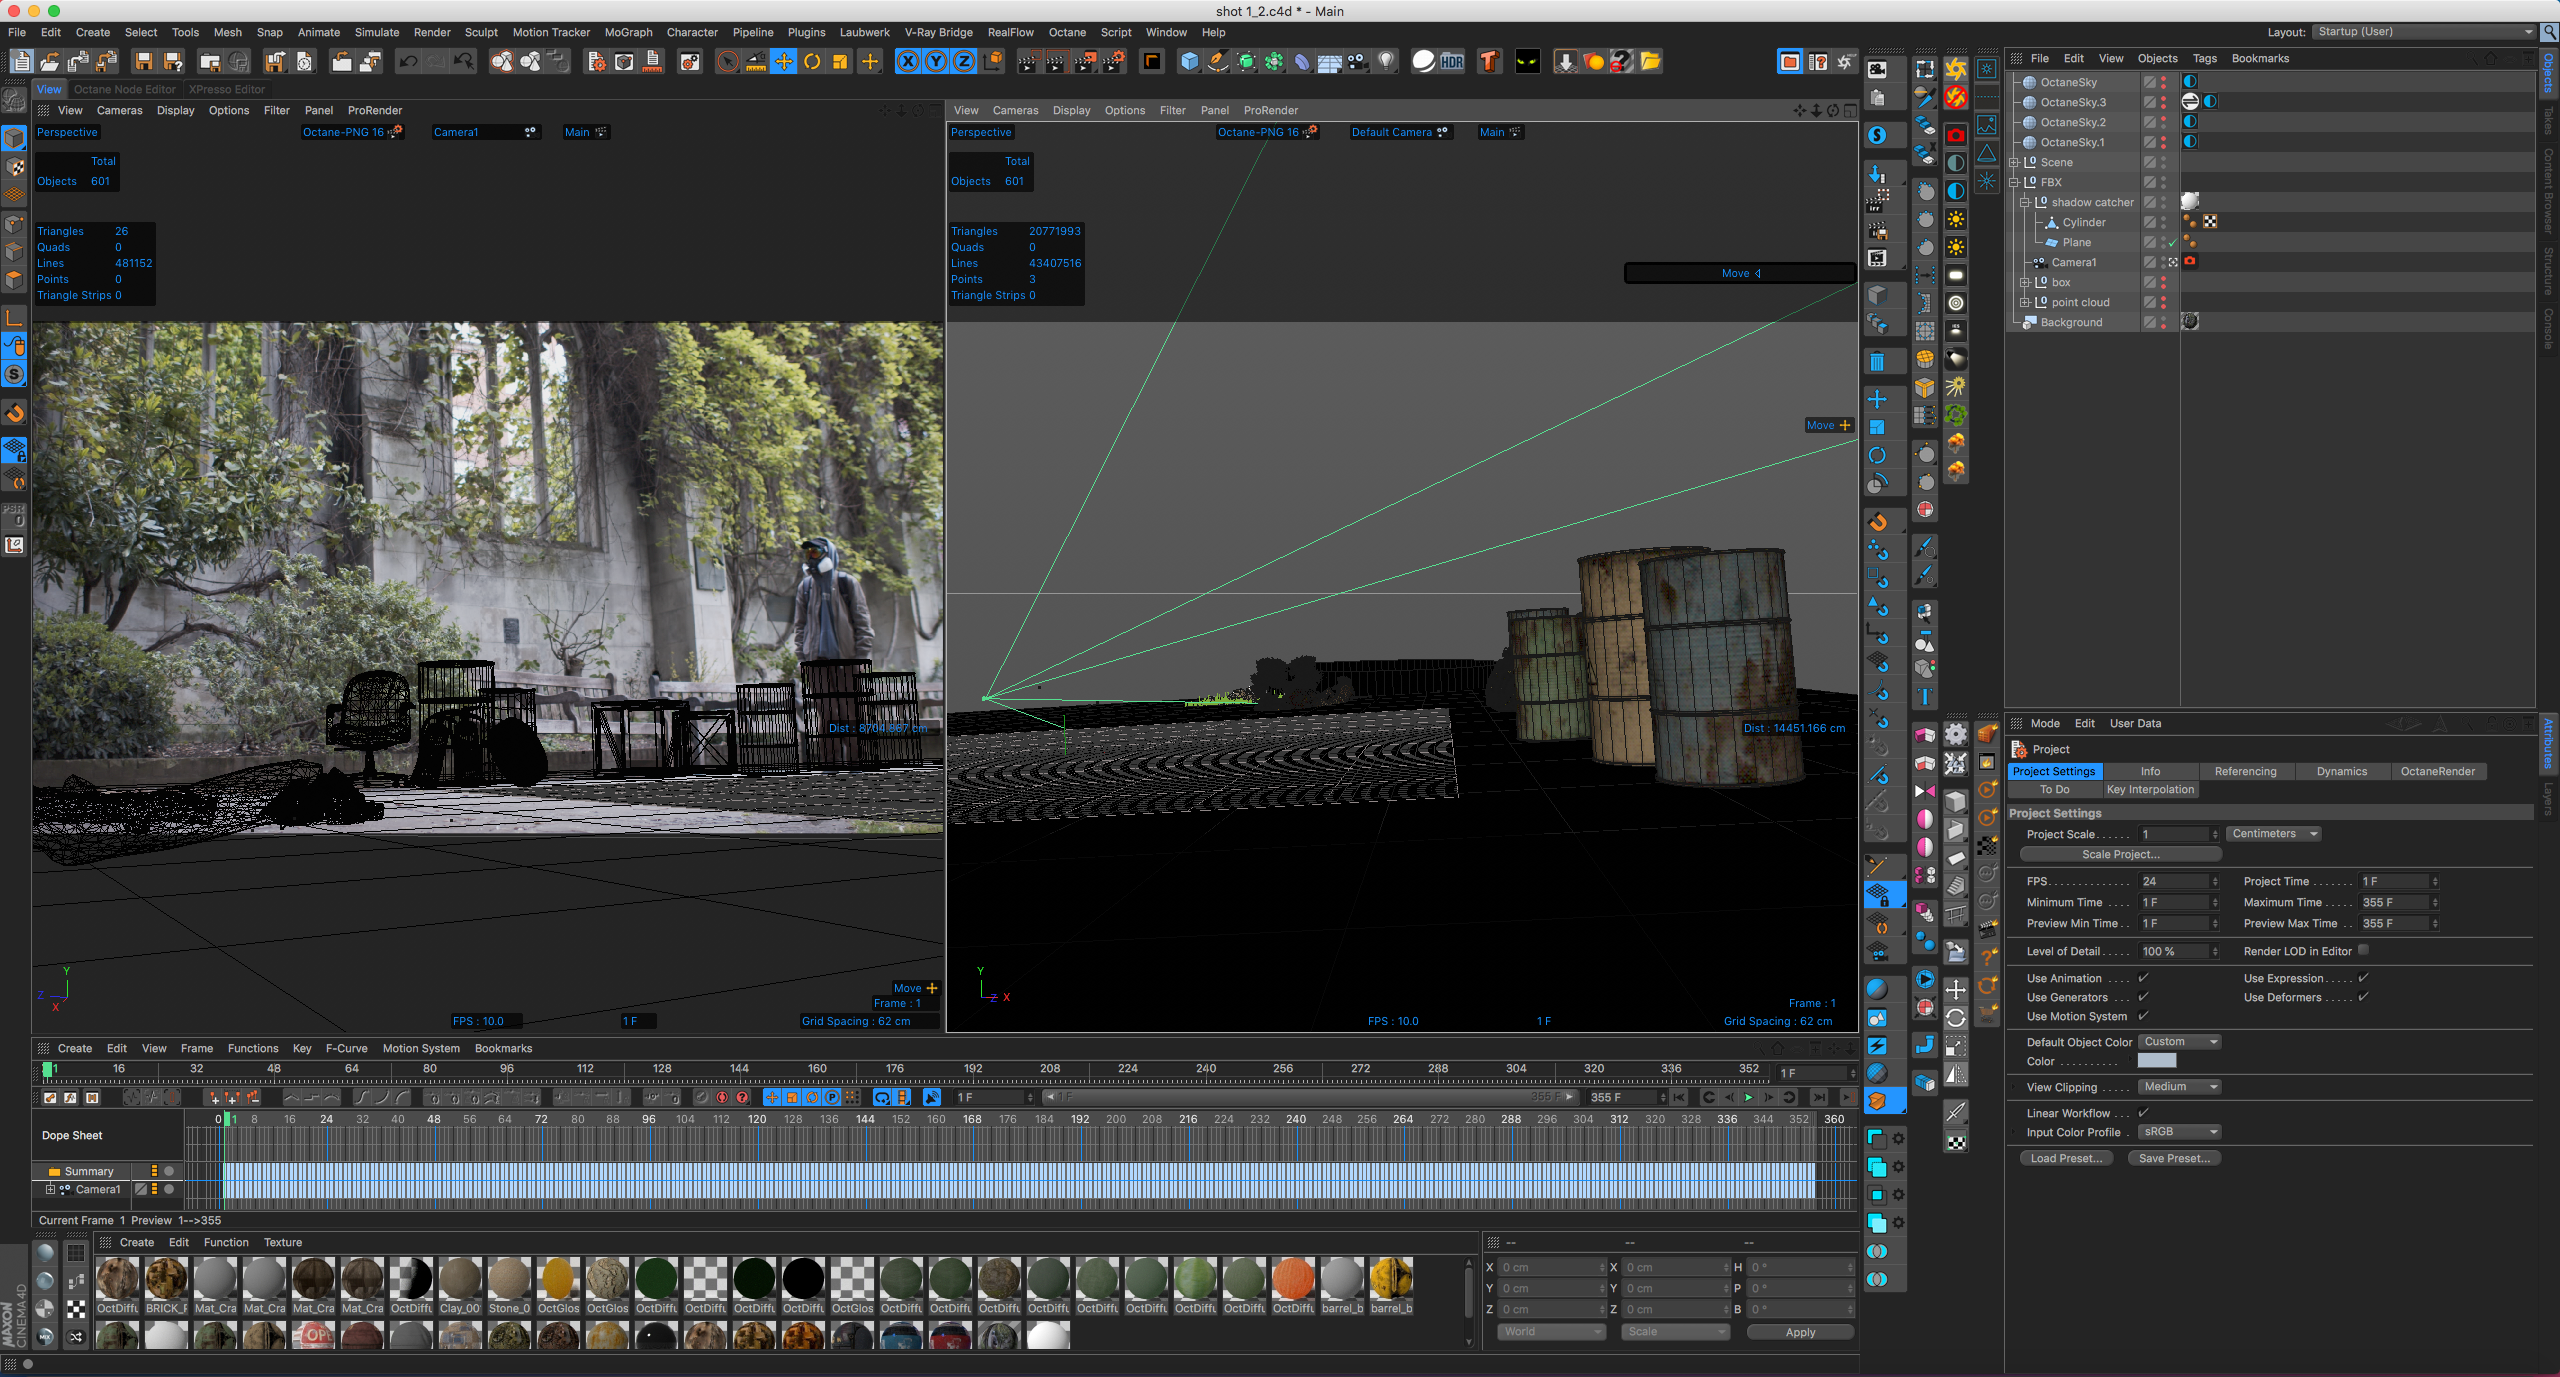
The post-production part is divided into four parts. The first part is the modelling of the robot, which was completed by Giulia very early. The second part is footages processing. Each of us is assigned 2 shots, which means that our group uses independent division of labour, that is, each person is responsible for all the roto, tracking, cleaning, compositing, colour correction, etc. . The third step is the production, rendering, and compositing of the 3D scene, and the fourth step is to combine all the shots and complete the final colour grading.
We set the technical standards from the beginning of the shooting. We all use ProRes 422 encoding. This encoding can maintain the picture quality without loss and provide up to 10bit colour depth. At the same time, we use a Log colour to shoot. At the beginning of post-production, the Log colour is restored to normal colour with the camera’s LUTs files to accurately match the 3D scene part. This time I tried to use Cinema 4D and Octane to complete all 3D design, rendering, and compositing. This is a brand new breakthrough for me, so if you count the Maya and Arnold processes, I have mastered the second 3D workflow.
As for Nuke’s footages processing, I divided it into two categories, one is the still lens and the other is a moving lens. The final and processing of the two kinds of shots are different. The still lens uses point tracking and stabilization processing, while the moving lens uses camera tracking. But the final result of the camera tracking is not very good, the camera path is not problematic, but the generated point cloud is incorrect, so this problem was finally corrected and matched by offsetting the 3D scene in Cinema 4D. The difference can be seen in the figures below.
Shot 1-Moving Lens Process

Shot 2-Still Lens Process


10) Color grading
Color is a very personal feeling, there is no absolute good or bad, only the most suitable combination. Therefore, in the final step of color grading, all members of our group first proposed the most ideal color style in their hearts and showed it for discussion. Then, we completed the color grading of the film together through online collaborative work. So the final result, the color style of the film, is the wisdom of all members of the group. After mutual discussion, experimentation, and integration, we finally retained the advantages of everyone and formed a unified plan. In color grading, we first perform color correction on all shots, so that the colors of all pictures are unified on a baseline. Then we add additional color nodes to enhance the color style of the picture. In this way, a well-balanced and consistent color film is obtained. In reference to the color style, I proposed a medieval yellow-green retro tone. This tone often appears in many war films during World War II and industrial revolution films, and it often appears in some European Renaissance films. . Finally, we decided to use my color style as a benchmark to match the colors of all rest shots.